
- Configure Live Sources if they have not been set up yet. See Configure Live Sources.
- Configure a monitoring template. In a monitoring template, you select the monitoring categories and the conditions to monitor. See Monitoring Templates.
- Create and activate sensors, which are the fundamental monitoring components of UP.Lens. Sensors ingest live video feeds to provide real-time observability and stream analysis. See Sensors.
- (Optional) Add sensor tiles and widgets to a multiviewer dashboard. See Manage Multiviewers.
Monitoring Templates
In a monitoring template, you define the categories that sensors will monitor, the alarm notifications that are enabled, and the parameters for generating those alarms.Create a New Template
When you create a new template, you can configure the categories that sensors will monitor. To create a transport template:- On the UP.Lens menu, click Templates. The Monitoring Templates page appears.
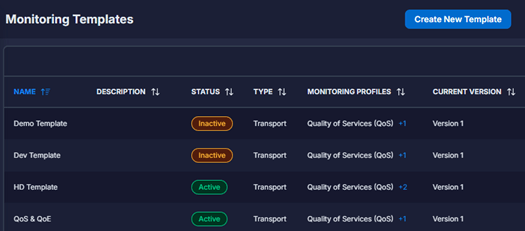
- Click the arrows beside a column heading to sort the template list by that column. The heading of the sort column contains an arrow that indicates the sort order: up for ascending (0-9, A-Z) and down for descending (Z-A, 9-0).
- Click Create New Template.
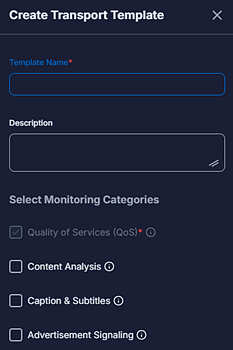
- In the Template Name box, type a name for the template.
- (Optional) In the Description box, type a description.
- Select the monitoring categories to enable for the template. Quality of Service (QoS) is always enabled.
- Content Analysis: Select to get key content quality metrics, including Audio and Video MOS, to analyze the results from the transcoding process.
- Caption & Subtitles: Select to get information about the quality of the caption/subtitle experience.
- Advertisement Signaling: Select to get information about advertisement signaling, such as whether SCTE-35 messages are present in a stream and whether ad breaks are occurring at the correct intervals.
- Click Create.
Modify a Template
After you create a monitoring template, you can modify the template’s details, including the template name, description, categories monitored, and alarm settings.If an active sensor is using a template, you can view the template’s details and configuration, but you cannot modify it. To modify the template, you must inactivate the sensor(s).
Modify Template Details
To modify a template’s details:- Click the Action icon beside the template to modify.
- Click Edit Details.
- Modify the template as needed, and then click Update.
Modify Alarm Settings
To modify a template’s alarm settings:- Click the Action icon beside the template to modify.
- Click Edit Configuration.
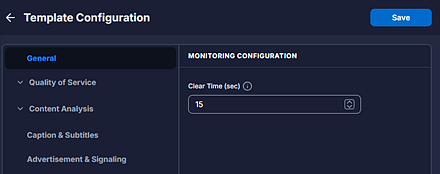
- Configure the template as necessary and click Save.
General Tab
To configure the general settings, click the General tab. Specify a value, in seconds, in the Clear Time (sec) box. Clear Time defines how long an underlying error condition must be resolved before the alarm clears. This prevents the system from flooding operators with notifications during periods of high-frequency errors. If the same alarm triggers multiple times within 15 minutes of the last alarm, the clear time increases exponentially. Once a 15-minute period passes without an alarm recurrence, the clear time resets to your configured minimum. The valid range is 15 to 900 seconds.Quality of Service / Transport Protocol Tab
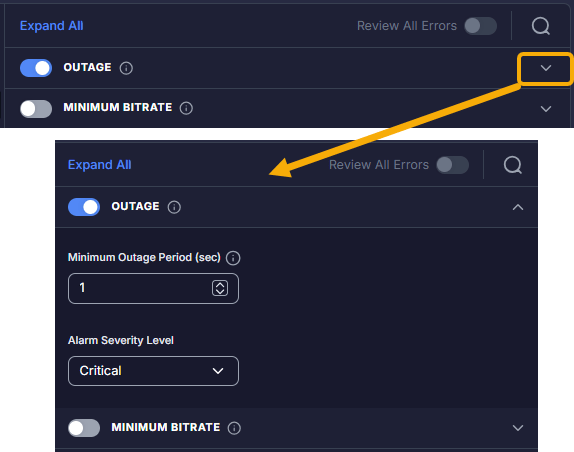
Expand the Quality of Service section and click the Transport Protocol tab, where you can configure network-level alarms. For each alarm you enable, select an Alarm Severity Level (Info, Warning, Minor, Major, or Critical) and define the thresholds listed in the following table.Quality of Service / Transport Stream Tab
In the Quality of Service section, click the Transport Stream tab, where you can configure alarms based on ETSI TR 101 290 guidelines for MPEG-TS transport integrity. For each priority level you enable, select an Alarm Severity Level (Info, Warning, Minor, Major, or Critical) and define the Sustain Period listed in the following table.Quality of Service / Video QoS Tab
In the Quality of Service section, click the Video QoS tab, where you can configure alarms based on video stream health and bitrate parameters. For each alarm you enable, select an Alarm Severity Level (Info, Warning, Minor, Major, or Critical) and define the parameters listed in the following table.Quality of Service / Audio QoS Tab
In the Quality of Service section, click the Audio QoS tab, where you can configure alarms based on audio stream health and bitrate parameters. For each alarm you enable, select an Alarm Severity Level (Info, Warning, Minor, Major, or Critical) and define the parameters listed in the following table.Quality of Service / Other QoS Tab
In the Quality of Service section, click the Other QoS tab, where you can configure alarms based on the presence of captions, subtitles, and ad-insertion signaling. For each alarm you enable, select an Alarm Severity Level (Info, Warning, Minor, Major, or Critical) and define the parameters listed in the following table.Content Analysis / Video QoE Tab
Expand the Content Analysis section and click the Video QoE tab, where you can configure alarms based on perceptual video quality and visible impairments. For each alarm you enable, select an Alarm Severity Level (Info, Warning, Minor, Major, or Critical) and define the parameters listed in the following table.
Content Analysis / Audio QoE Tab
In the Content Analysis section, click the Audio QoE tab, where you can configure alarms based on perceptual audio quality and audible impairments. For each alarm you enable, select an Alarm Severity Level (Info, Warning, Minor, Major, or Critical) and define the parameters listed in the following table.
Captions & Subtitles
Click the Captions & Subtitles tab, where you can configure the Caption Decode Errors alarm to check for errors when decoding caption data from the transport stream. Select an Alarm Severity Level (Info, Warning, Minor, Major, or Critical) and define the parameters listed in the following table.Advertisement & Signaling Tab
Click the Advertisement & Signaling tab, where you can configure alarms based on SCTE-35 ad-insertion signaling and alignment. For each alarm you enable, select an Alarm Severity Level (Info, Warning, Minor, Major, or Critical) and define the parameters listed in the following table.Filter the Template List
To filter the template list by name, click the Search icon and type some or all of a template name.View Template Details
To view a monitoring template’s details, click the Action icon beside the template and select View Details. To view a template’s alarm settings, click the Action icon beside the template and select View Configuration.Copy a Template
To copy a monitoring template:- Click the Action icon beside the template to copy.
- Click Duplicate.
- In the Template Name box, type a name for the template.
- Click Save.
Delete a Template
If you don’t want to reuse a monitoring template, you can delete it after deleting the sensor. To delete a monitoring template:- Click the Action icon beside the template to delete.
- Click Delete.
- Click Delete to confirm that you want to delete the template.
Sensors
Sensors are cloud-native workers deployed within a region (either in Telestream’s infrastructure or a customer’s virtual private cloud) to monitor live streams. In UP.Lens, sensors are hooked to Secure Reliable Transport (SRT) feeds to analyze signals without disrupting the workflow. Sensors have two levels of monitoring capabilities:- Basic Sensor: Focuses on Quality of Service (QoS). It monitors network-level performance, including latency, bandwidth, link speed, and jitter.
- Premium Sensor: Focuses on Quality of Experience (QoE) and compliance. In addition to QoS, a premium sensor performs deep video and audio analysis (such as detecting frozen frames or silent audio) and monitors SCTE-35 ad-trigger markers.
- Sensors feed into a multiviewer dashboard. This allows you to see live video and audio bars in a grid format. You can identify if a camera feed fails, for example, and you can automatically move the worst-performing feeds to the top of the screen so you can focus on errors.
- While the multiviewer is for real-time observation, the sensors constantly record metadata and thumbnails to allow for retrospective analysis. If a stream fails, you can rewind to see exactly when key performance indicators, such as bitrate, began to drift.
- Sensors help correlate issues across different points, such as identifying whether a problem in a distribution feed originated at the source camera.
- Sensors are designed to be predictive. By monitoring trends (such as latency drifting in the wrong direction), sensors can alert you before a signal degrades significantly, providing actionable alerts.
- Sensors help you ensure that a broadcast is meeting its legal and financial requirements. Sensors confirm that SCTE-35 markers are present so that ads can be inserted and the feed can be monetized. Sensors validate that the correct language tracks, captions, and subtitles are present and legible.
- Technical vitals: Real-time metrics such as bitrate, bandwidth, latency, jitter, and link speed.
- Stream attributes: Details such as resolution (for example, UHD vs. HD), frame rate, and codec information (for example, AVC vs. HEVC)
- Audio/video track info: Metadata identifying the number of audio tracks, the language of those tracks, and the presence of captions or subtitles.
- Compliance markers: Critical signaling data such as SCTE-35 ad markers, which indicate when an advertisement can be inserted into a stream.
View Sensors
To view the existing sensors, click Sensors on the UP.Lens menu. At the top of the Sensors page that appears, you can view the total number of sensors and how many sensors are in the following alarm states:- Gray: Inactive
- Red: Critical alarm
- Dark orange: Major alarm
- Yellow: Minor alarm
- Light orange: Warning alarm
- Green: Good/no alarms

Create a Sensor
To create a sensor:- On the UP.Lens menu, click Sensors.
- Click Create New Sensor.
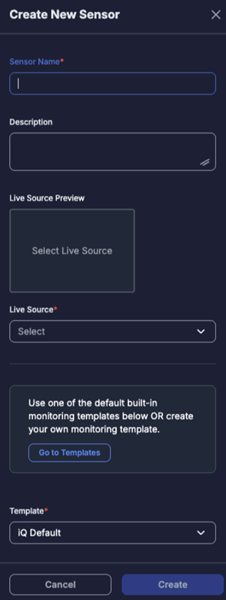
- In the Sensor Name box, type a name for the sensor.
- (Optional) In the Description box, type a description.
- A preview of the source appears in the Live Source Preview box.
- From the Live Source list, select a live source. Note: Multiple sensors can monitor one source, but sensors and Live Sources typically have a 1:1 relationship.
- Select a template from the Template list. You can use one of the built in monitoring templates or create your own monitoring template. To create a monitoring template, click Go to Templates and create a template. See Create a New Template.
- Click Create. The sensor has been created, but it is not active yet. See Activate a Sensor.
Filter the Sensor List
By default, the sensor list displays all active and inactive sensors. The colored status indicators at the top of the page indicate how many sensors are inactive and how many are in the various alarm severity states: Critical, Major, Minor, Warning, and Good. Click any of those colored status indicators to filter the sensor list by that indicator.
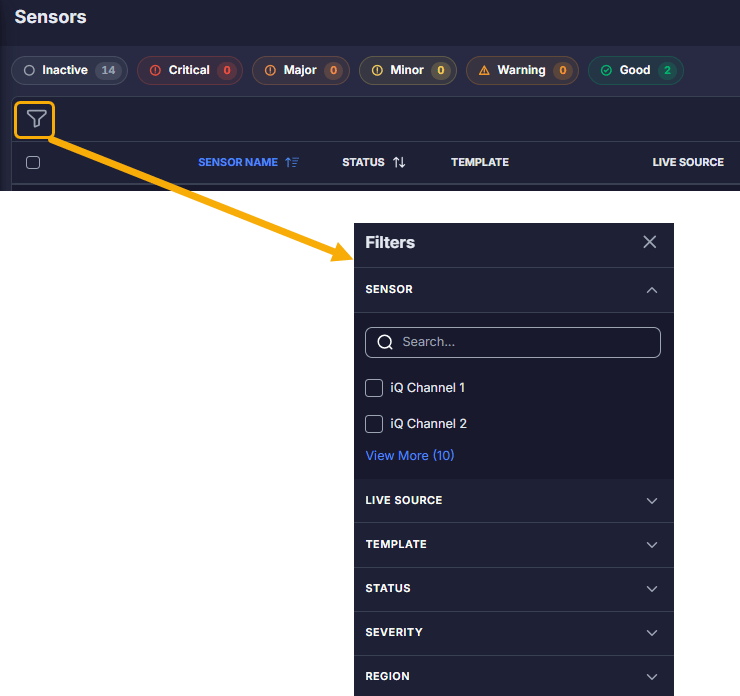
- Click the Filter icon and select the desired filter parameters:
- Filter by sensor name: Expand the Sensor section and select the sensors to display.
- Filter by live source: Expand the Live Source section and select the live sources to display.
- Filter by template: Expand the Template section and select the templates to display.
- By status: Expand the Status section and select Active and/or Inactive.
- Filter by alarm severity: Expand the Severity section and select the alarm severities to display: Critical, Major, Minor, and/or Warning.
- Filter by region: Expand the Region section and select the regions to display.
- Click Apply.
Sort the Sensor List
You can sort the sensor list by the info in any of the following columns: Sensor Name, Status, Up Time, Sensor Mon Time, or Updated Date. Click a column heading to sort the list. An up arrow indicates ascending order (0-9, A-Z); a down arrow indicates descending order (Z-A, 9-0).

Modify a Sensor
To modify a sensor:- Click the Action icon beside the Created Date for the sensor.
- Click Edit.
- Modify the sensor as needed, and then click Update.
Delete a Sensor
You can delete individual sensors or all sensors. When you delete a sensor, it is removed from any multiviewers that refer to it. See Manage Multiviewers. To delete individual sensors:- Select the checkbox for the sensor(s), and then click Delete.
- Click Delete to confirm that you want to delete the sensor(s).
- Select the Select All checkbox, and then click Delete.
- Click Delete to confirm that you want to delete this sensor.
Preview a Sensor
Sensor previews provide a focused, high-fidelity view of a stream’s output. A sensor preview provides:- Live video and audio: A full-motion, subsecond latency view of the signal as it exists in the cloud.
- Deep metadata: A real-time readout of vitals such as bitrate, resolution, audio track mapping, and SCTE-35 ad markers.
- Direct control: You can toggle between live monitoring and historical troubleshooting.
- Ensure that the video content is correct, framed properly, and free of artifacts (such as macroblocking or ghosting).
- Verify that the stream matches its intended specifications. For example, you can confirm that a feed is UHD and has audio tracks in a particular language.
- Triage alarm conditions. When an alarm fires in the multiviewer, you can use a sensor preview to spot-check the error before escalating the issue.
- Look back at historical trending data.
- Click the Action icon beside the Created Date for the sensor.
- Click Preview.
The following information about the stream is displayed when available:
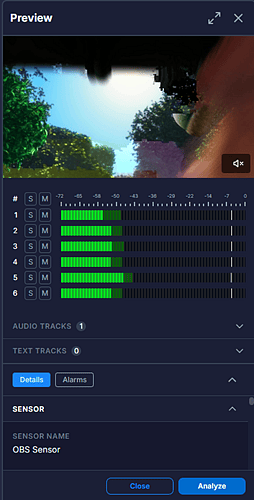
- Live video preview:
- Click the Speaker icon to mute or unmute the audio.
- Click the Full Screen icon to view a full-screen preview.
- Audio tracks: Displays the audio bars for the audio channels. Click S beside a channel to listen to the audio for just that channel, or click M to mute the channel.
- Text tracks: A list of any available text tracks.
- Sensor name: The name of the sensor.
- Region: The region that the stream is in.
- SRT mode: The SRT mode (Caller or Listener).
- Connection: The live source that provides the connection to the sensor.
- Monitoring template: The monitoring template associated with the sensor.
- Video PID: The stream’s video PID.
- Codec: The stream’s codec.
- Resolution @ FPS: The stream’s resolution in frames per second.
- Profile @ level: Profile is the standard sets of video codec capabilities. Level is the specified set of constraints that indicate a degree of required decoder performance for a video profile.
- Chroma format: The streams chroma format.
- Bitrate: The stream’s bitrate.
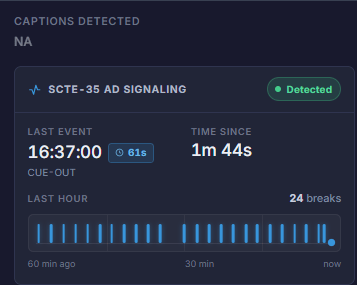
- Captions detected: Indicates whether captions have been detected.
- Ad signaling detected: Indicates whether ad signaling has been detected and provides a timeline of ad signaling activity for the last 60 minutes.
- Live video preview:
- To view alarms for the stream, click Alarms. To view inactive alarms, turn off the Active Only toggle.
- To view the Visual Trending data, click Analyze. See Visual Trending.
View Visual Trending Data
The Visual Trending view provides a graphical representation of stream performance metrics over time. To view Visual Trending data:- Click the Action icon beside the Created Date for the sensor.
- Click View Visual Trending. See Visual Trending.
Activate a Sensor
When you activate a sensor, UP.Lens provisions a compute resource in the cloud (Telestream’s or yours), deploys the sensor, and starts monitoring the billing clock. Billing for activated sensors is per minute. You can activate individual sensors or all sensors. To activate individual sensors:- Select the checkbox for the sensor(s), and then click Activate.
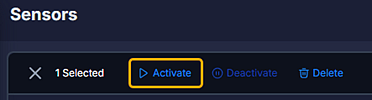
- Click Activate to confirm that you want to activate the sensor(s).
- Select the Select All checkbox, and then click Activate.
- Click Activate to confirm that you want to activate this sensor.
Deactivate a Sensor
When you deactivate a sensor, per-minute billing of the sensor stops. Deactivate sensors when they are not in use to avoid unnecessary infrastructure costs. You can deactivate individual sensors or all sensors. To deactivate individual sensors:- Select the checkbox for the sensor(s), and then click Deactivate.
- Click Deactivate to confirm that you want to deactivate the sensor(s). The sensor status changes from Active (green) to Inactive (gray).
- Select the Select All checkbox, and then click Deactivate.
- Click Deactivate to confirm that you want to deactivate these sensors. The sensor status changes from Active (green) to Inactive (gray).