
Review Button
Opens the Review menu, displaying the Browser, Player, and Settings tabs.Browser Tab
Opens the Browser view. You can use the Browser view to find files or presigned URLs, or to create media packages and playlists. The Review browser allows you to browse your configured S3 buckets, and open a session for any bucket. Review can open any file types. Review opens only files from cloud storage. The file browser includes the following controls:Create Media Package Button
Creates a media package from the media files selected.Create Playlist Button
Opens the Create Playlist view for creating playlists.Open Button
Opens the selected media file.Browse Button
Displays a list of the available stores.Recents Button
Displays a list of the 10 last files opened.Presigned URL Button
Displays a list of available pre-signed URLs.Find Store Field
When a search term is entered followed by pressing the Enter key, Review displays a list of search results.Player Tab
Opens the Media Player view. You can use the Media Player view to play files and playlists. The Media Player view includes controls, panels and tabs that enable seamless video playback and manual quality control of media assets. The Media Player is optimized for 16:9 displays at 1920 x 1080 pixels. However, when running with non-standard aspect ratio screens, for example Ultra-wide screens, Review pillar-boxes content in full-screen mode. Selecting Player in the left-side navigation bar opens the media player and media assets for the currently active session. If there is no active session, Player opens a browser for finding the assets desired. By default, Review terminates a session after five minutes of inactivity. You can browse from an active session in the player to other Review controls, such as Settings. To return to the active session, click Player in the left-side navigation bar.Media Player Window
Displays the video of the file selected. With a file selected, when the cursor hovers above the Media Player window, Review displays the Media Player controls.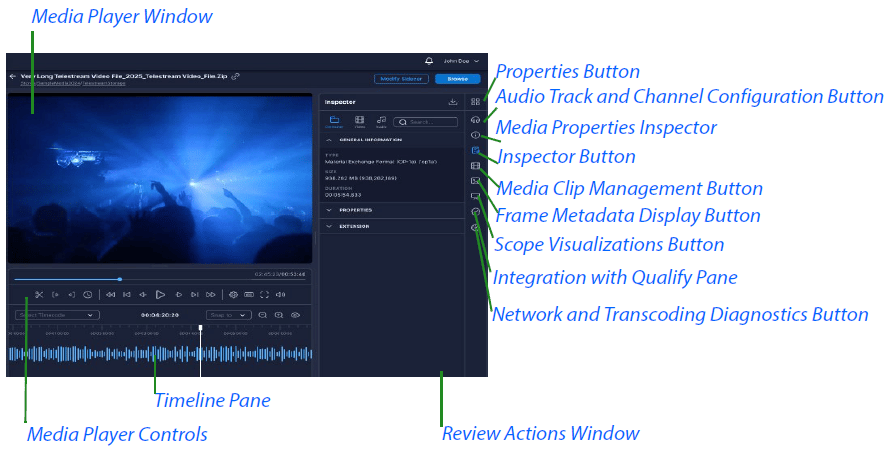
Add Sidecar Button
Opens a dialog where you can add sidecar files. Enables users to open Media Packages that contain any number of sidecar files (both audio and caption files). There are no restrictions on the number of sidecar files nor the file type.Media Player Controls
With a file selected, when the cursor hovers above the Media Player window, Review displays the Media Player controls.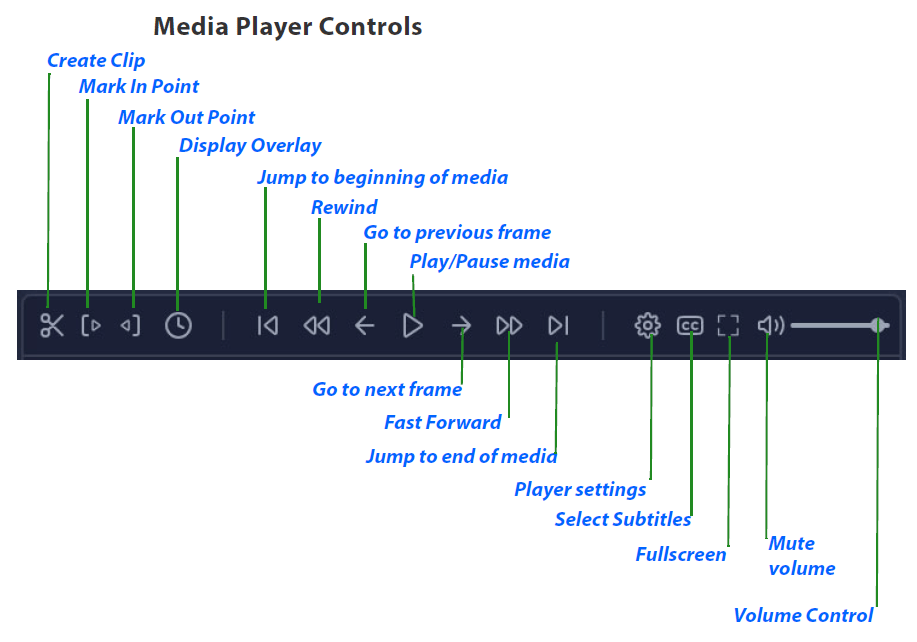
p. Creates a clip between the marked In and Out points.
Mark In Point — Keyboard shortcut: i. Marks the frame under the playback head as the In point of a clip.
Mark Out Point — Keyboard shortcut: o. Marks the frame under the playback head as the Out point of a clip.
Display Overlay Timecode — Toggles the timecode display on the Media Player screen, on and off.
Jump to beginning of media — Returns the playhead to the beginning of the clip.
Rewind (click again to increase speed) — Keyboard shortcut: j. Plays the clip backwards. Each additional click increases rewind speed.
Go to previous frame — Keyboard shortcut: Left Arrow. Moves the playhead back one frame.
Play/Pause media — Play keyboard shortcut: spacebar. Moves the playhead back one frame.
Go to next frame — Keyboard shortcut: Right Arrow. Moves the playhead forward one frame.
Fast Forward — Keyboard shortcut: l. Plays the clip forwards. Each additional click increases fast-forward speed.
Jump to end of media — Advances the playhead to the end of the clip.
Player settings — Opens a pop-up dialog listing the following player settings:
- Video Quality — Enables you to select the resolution of the Media Player window video display.
- Playback speed — Opens a pop-up menu of playback speeds.
- Safe Area — Displays a pop-up menu of title-safe and action-safe area reticules.
- Loop Playback — The media player can replay a clip continuously. Drag the slider to the left to turn off looping. Drag the slider to the right to enable looping.
- Playlist Auto-Play — The media player can automatically play the next item in a playlist. Drag the slider to the left to turn off playlist auto-play. Drag the slider to the right to enable playlist auto-play.
Review can display one subtitle or caption at a time. The subtitle sub-menu allows selection of the desired sidecar file, channel (CEA-608), service (CEA-708), page (teletext), or both CEA-608 and CEA-708.
f. Displays the Media Player fullscreen. To exit fullscreen display, press Esc.
Mute volume — Mute toggles audio playback on and off. When Mute is disabled, Review enables the volume-control slider to the right of the Mute button.
Volume Control — Slide the slider left to reduce audio volume, or to the right to increase audio volume.
Timeline Pane
Displays timecode, markers, In points, and Out points.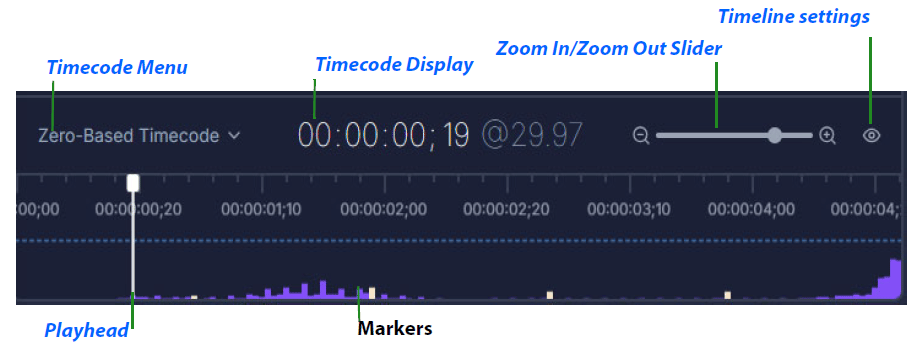
Note: By default, the Timeline pane displays 10 seconds of the selected file.
Timecode Menu
The Timecode Menu displays Zero-Based Timecode by default. When clicked, Review opens the timecode drop-down menu. The drop-down menu lists the types of timecode available in the file selected, such as Frames, Normal Play Time (NPT), and Zero-Based Timecode.Playhead
Indicates the location on the timeline of the frame displayed.Timecode Display
Displays the timecode location of the playhead, in the timecode format selected in the Timecode Menu.Zoom In/Zoom Out Slider
To zoom in the timeline, slide the zoom slider to the right. To zoom out the timeline, slide the zoom slider to the left.Timeline settings
Opens a pop-up menu listing the following displays available for the timeline:- Waveform — Displays the audio waveform.
- I, P, B Frames — Displays Intra Frame, Predicted Frame, and Bi-Directional Frame markers.
- SCTE 35/104 — Displays SCTE 35 and SCTE 104 markers.
- Nielsen — Displays Nielsen markers.
- Clips — Displays clip indicators in the timeline.
Review Actions Window
This inspection pane displays the view for the right-side tab selected.Properties Button
Opens the Properties pop-up menu, listing the following options: Show Properties — Opens the Actions window, which displays various properties. Hide Properties — Hides the Actions window. Show Bottom Properties — Opens the Bottom Properties window. The Bottom Properties window expands the panes of the Audio Track and Channel Configuration Tab. Hide Bottom Properties — Hides the Bottom Properties window.Audio Track and Channel Configuration Button
Opens the Audio Track and Channel Configuration view, which displays all the channels in the currently-selected track, regardless of the number of channels Review renders to the speakers. Displays the audio, channels, tracks, and VU meters.Note: For PCM audio, the Audio tab displays all channels by default, displaying all audio channels in all tracks present. However, you still can select PCM tracks independently. For other audio formats, Review displays individual audio tracks without the all-channels option.
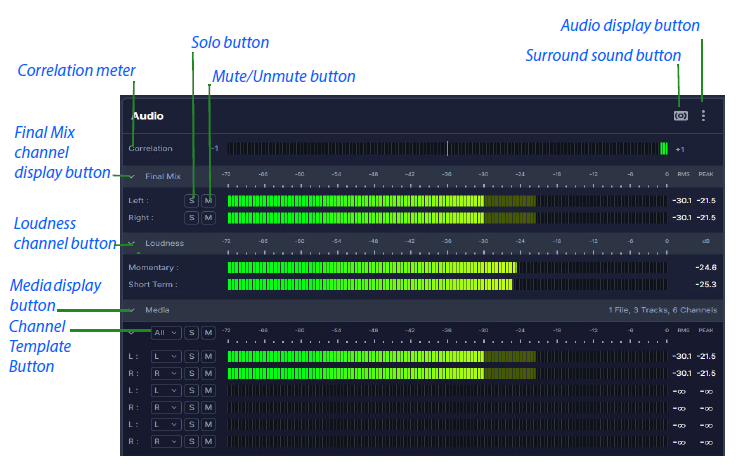
- Automatic Display — Review selects the audio display automatically.
- Track Display — Review displays audio tracks individually.
- Channel Display — Review displays audio channels.
- Correlation Meter — Toggles the Correlation Meter on and off.
- Reset Channel Labels — Resets the channel labels to their defaults.
- Save as Template — Saves the current arrangement of channels as a template.
Media Properties Inspector Button
Opens the Media Properties Inspector view. Displays the Container, Video, Audio, and Metadata properties in dedicated sub-tabs.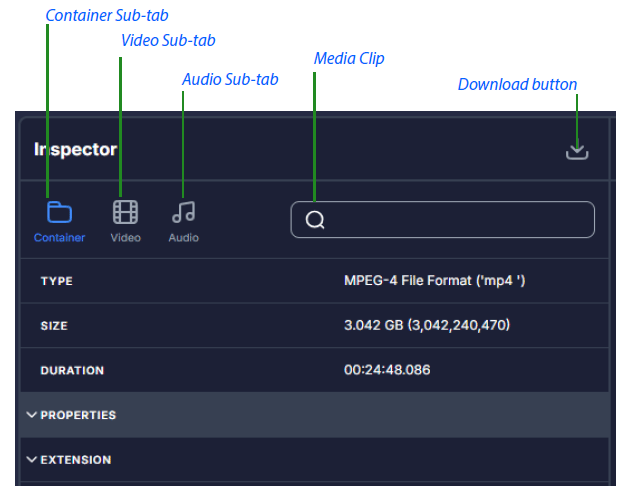
Inspector Button
Opens the Inspector view which displays data buttons for Container, Video and Audio.Media Clip Management Button
Opens the Media Clip Management view. Displays metadata for logged subclips.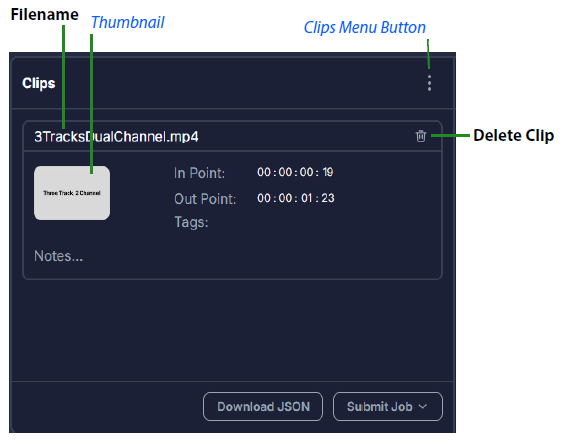
Frame Metadata Display Button
Opens the Frame Metadata Display view. Displays metadata, including close-caption and marker data, for the frame under the playhead in the Media Player window.Scope Visualizations Button
Opens the Scope Visualizations view, containing a button for each of the available scopes. Slider controls for Gain and Graticule reside at the bottom of the Scopes pane.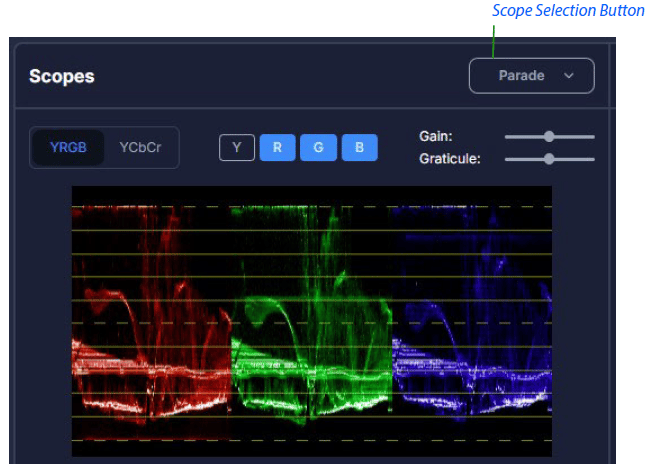
Scope Selection Button
Each Scope selection button opens one of the scopes, as follows:- Parade — Displays a parade scope for either YRGB or YCbCr video. You can use scopes for plotting component brightness distributions. Parade scopes analyze and display saturation levels of either YRGB or YCbCr in your video.
- Waveform — Displays a waveform scope for either YRGB or YCbCr video.
- Vector — Displays a vector scope. You can use a vector scope for plotting U-V brightness distribution. The vector scope analyzes and displays hue and saturation of colors in your video. The Vector scope graticule squares represent the locations of the color primaries at 100%. The colors displayed are red, magenta, blue, cyan, green, and yellow. The further away from the center each color is, the more saturated it is. The location of each color on the scope indicates its specific hue and saturation in the image.
- Chromaticity — Displays a chromaticity scope.
- Histogram — Used for plotting histograms of brightness. Analyzes single-pixel horizontal slices of a video frame (ex. 1,920 pixels per slice for HD) and plots each vertical pixel according to its gray level (or luminance value). This allows you to quickly and visually locate bright and dark areas in your video. This scope makes it easier to spot things that might be hard for your eyes to notice, especially when using a monitor that may be inaccurate or poorly calibrated.
- Goniometer — Displays levels for audio channels on a vectorscope.
Note: Use of a scope opens a separate session for scope data. This increases Review bandwidth use, and consumes additional processing resources of the Review server. Higher resolution videos, such as 4K, or higher frame rates, such as 60 fps, require more bandwidth than lower-resolution videos, such as SD, or lower frame rates such as 30 fps. To limit bandwidth use, view a scope for a single frame rather than for a continuously-playing media file.
Integration with Qualify Pane
Opens the Integration with Qualify view containing the Validated, Infos, Warnings, and Errors subtabs; and a search field. The Integration with Qualify pane enables you to import Qualify reports.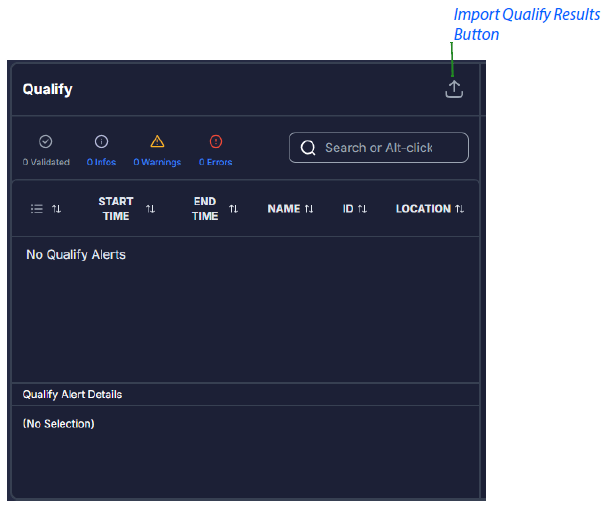
- Import Qualify results from json file — Imports Qualify results from a json file.
Network and Transcoding Diagnostics Button
Opens the Network and Transcoding Diagnostics view. This is a troubleshooting view, containing meters for Ping, Video Speed, and Audio Speed. These meters display speeds for the parts of the media files in the buffer.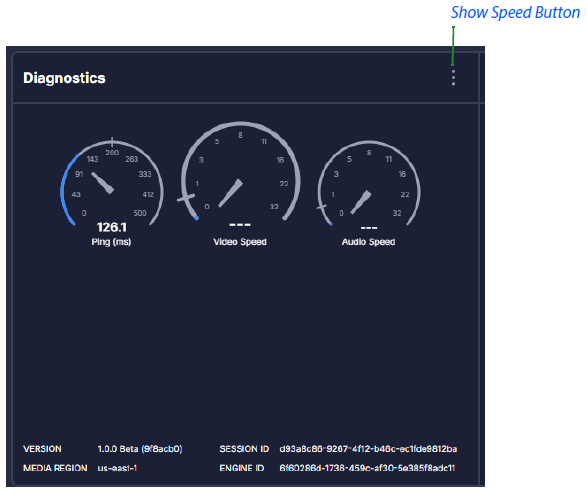
- Show Speed Test — Opens a control for measuring download speed.
- Show Engine Speed — Toggles the engine-speed-indicator display on and off. The engine-speed indicator is a thin line placed in the center of the Video Speed indicator.