> ## Documentation Index
> Fetch the complete documentation index at: https://docs.up.telestream.com/llms.txt
> Use this file to discover all available pages before exploring further.
# Manage Multiviewers
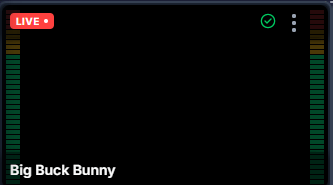
A multiviewer is a live “eyes-on-glass dashboard.” A multiviewer provides a real-time, composite view of numerous video signals simultaneously. UP.Lens multiviewers run in the cloud and are accessible via a web browser. You can add multiple sensor tiles to each multiviewer. Each video feed in the grid is a sensor tile that displays full-motion video and live audio bars. You can also add interactive widgets for wall clocks, active alarm logs, and dynamic sensor lists.
With a multiviewer, you can:
* Validate signals: The primary use of a multiviewer is to confirm that camera feeds, studio feeds, and program feeds are healthy. A multiviewer allows you to instantly see if the color is off or if the audio has gone silent, for example.
* Triage and manage poor-performing channels: If you are managing dozens of feeds, you can use a multiviewer for “penalty box” sorting, where worst-performing channels are automatically moved to the top or left of the screen. This allows you to focus on the feeds that require immediate attention.
* Verify metadata and compliance: You can use a multiviewer to validate technical requirements at a glance, such as:
* Ensure that the language tracks are correct.
* Check for the presence of captions and subtitles.
* Verify resolution (for example, ensure that a feed is UHD rather than HD).
* Bridging the analysis gap: Multiviewers serve as the entry point for deeper troubleshooting. If you observe an issue in a sensor tile, you can click that tile to jump to the Troubleshooting Time Machine, which allows you to see exactly when the problem started and what caused it.
## View Multiviewers
To view existing multiviewers:
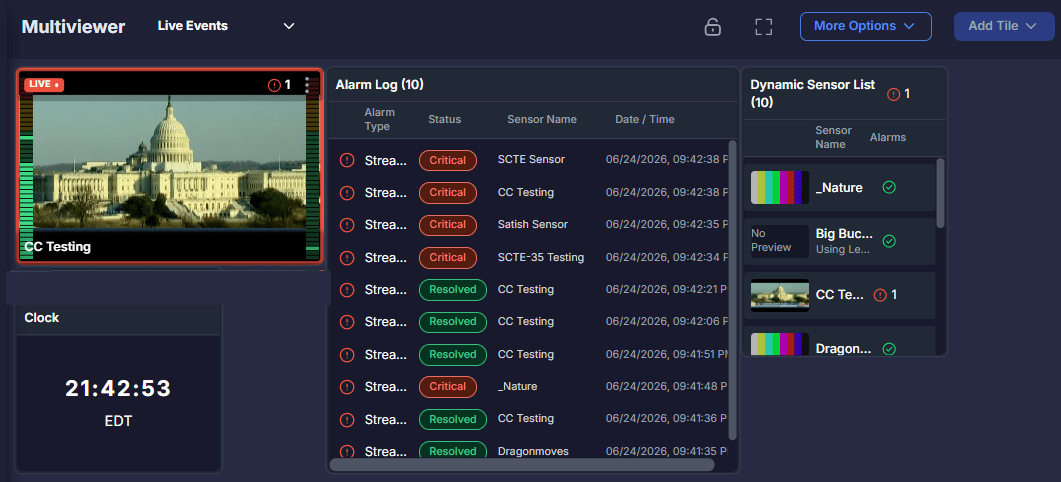
1. Click **Multiviewers** on the UP.Lens menu. The Multiviewer page appears. In the following example, the multiviewer has several sensor tiles, several widgets, and a Dynamic Sensor List, which lists the active and inactive sensors that this multiviewer is associated with.
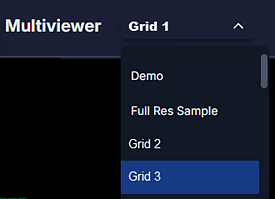
 2. Each multiviewer that you can access is listed in the Multiviewer list. To view a different multiviewer, select it from the list.
 3. To view a multiviewer in full-screen mode, click the **Full Screen icon**.
If you’d like, you can open each multiviewer in a separate browser tab or external display.
## Create a Multiviewer
To create a multiviewer:
1. Click **More Options**, and then click **New Multiviewer**.
3. To view a multiviewer in full-screen mode, click the **Full Screen icon**.
If you’d like, you can open each multiviewer in a separate browser tab or external display.
## Create a Multiviewer
To create a multiviewer:
1. Click **More Options**, and then click **New Multiviewer**.
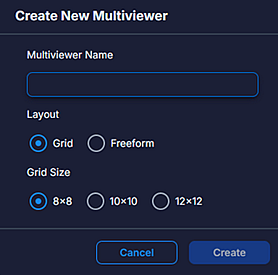 2. In the **Multiviewer Name** box, type a name for the multiviewer.
3. In the **Layout** section, select a layout type:
* **Grid:** A structured grid where tiles snap into place.
* **Freeform:** A freeform layout where you can place items anywhere you want.
4. In the **Grid Size** section, select the size of the grid: **8x8**, **10x10**, or **12x12**.
5. Click **Create**.
6. Add sensor tiles and/or widgets to your multiviewer. See [Add a Sensor Tile](#add-a-sensor-tile) and [Add a Widget](#add-a-widget).
7. Customize your visual workspace by moving and resizing the tiles and widgets. For example, you can place priority signals in prominent positions or enlarge primary feeds so they take up more screen real estate.
8. When you’re done editing the multiviewer, click the **Save icon** to save your changes and disable editing.
2. In the **Multiviewer Name** box, type a name for the multiviewer.
3. In the **Layout** section, select a layout type:
* **Grid:** A structured grid where tiles snap into place.
* **Freeform:** A freeform layout where you can place items anywhere you want.
4. In the **Grid Size** section, select the size of the grid: **8x8**, **10x10**, or **12x12**.
5. Click **Create**.
6. Add sensor tiles and/or widgets to your multiviewer. See [Add a Sensor Tile](#add-a-sensor-tile) and [Add a Widget](#add-a-widget).
7. Customize your visual workspace by moving and resizing the tiles and widgets. For example, you can place priority signals in prominent positions or enlarge primary feeds so they take up more screen real estate.
8. When you’re done editing the multiviewer, click the **Save icon** to save your changes and disable editing.
Add a Sensor Tile
Sensor tiles provide low-latency proxy streams for full frame-rate video and audio level monitoring. To add a sensor tile to your multiviewer:
1. Click **Add Tile**, and then click **Sensor**.
2. On the tile that you added, click **Select Sensor**.
3. Select the sensor to assign to the tile. For details about configuring sensors, see [Create a Sensor](/lens/get-started-with-up.lens/#create-a-sensor). **Tip:** You can use the Select Sensor search bar to filter the list of sensors.
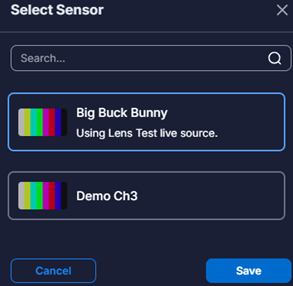 4. Click **Save**. If the sensor is active, you will see the live video and audio bars appear in the tile within seconds.
 Widgets are non-video data modules that can be added, sized, and arranged within a multiviewer mosaic. They are designed to provide at-a-glance density, allowing you to monitor dozens of channels or system vitals without needing to see a live video stream for each one.
To add a widget to a multiviewer:
1. Click **Add Tile**, and then click **Widget**.
2. On the tile that you added, click **Select Widget**.
3. Select the widget to assign to the tile:
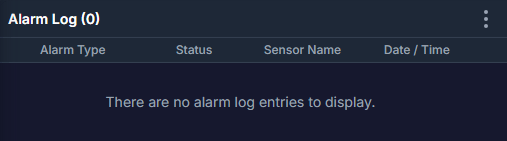
* **Alarm Log:** To display a list of alarms filtered by severity and status. See [Configure an Alarm Log Widget](#configure-an-alarm-log-widget).
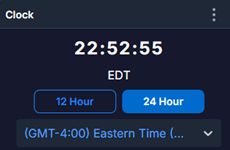
* **Clock:** To display the current time, with time zone support, for precise timing and synchronization across different global regions.
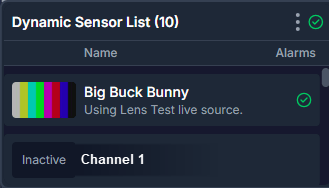
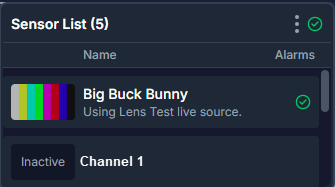
* **Dynamic Sensor List:** To display a list of configured sensors dynamically and monitor the color-coded health status of secondary feeds.
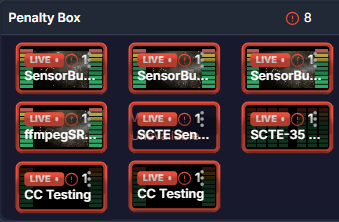
* **Penalty Box:** The Penalty Box widget reserves space on the multiviewer mosaic that is used to highlight sensors with active alarms, by severity. The Penalty Box area is customizable and can contain a 2x2, 3x3, or 4x4 grid of sensor tiles that are currently in alarm. If there are many concurrent feeds being monitored, the Penalty Box ensures that only feeds that need immediate attention are presented on the live multiviewer.
* **Sensor List:** To display a list of individually selected sensors. **Tip:** You can use the **Select Widget** search bar to filter the list of sensors.
4. Click **Save**.
#### Configure an Alarm Log Widget
After you add an Alarm Log widget to a multiviewer, configure its parameters:
1. On the widget, click the **Edit icon**, and then click **Configure**.
2. From the **Severity** list, select the severity level of alarms to display in the widget: **Select All**, **Critical**, **Major**, **Minor**, **Warning**, or **Info**.
3. From the **Status** list, select the alarm status type to display: **All**, **Active**, or **Resolved**.
4. From the **Limit** list, select the number of alarms to display in the widget.
5. From the **Refresh Interval** list, select how frequently the alarm data will be refreshed in the widget.
6. Click **Save**.
Widgets are non-video data modules that can be added, sized, and arranged within a multiviewer mosaic. They are designed to provide at-a-glance density, allowing you to monitor dozens of channels or system vitals without needing to see a live video stream for each one.
To add a widget to a multiviewer:
1. Click **Add Tile**, and then click **Widget**.
2. On the tile that you added, click **Select Widget**.
3. Select the widget to assign to the tile:
* **Alarm Log:** To display a list of alarms filtered by severity and status. See [Configure an Alarm Log Widget](#configure-an-alarm-log-widget).
* **Clock:** To display the current time, with time zone support, for precise timing and synchronization across different global regions.
* **Dynamic Sensor List:** To display a list of configured sensors dynamically and monitor the color-coded health status of secondary feeds.
* **Penalty Box:** The Penalty Box widget reserves space on the multiviewer mosaic that is used to highlight sensors with active alarms, by severity. The Penalty Box area is customizable and can contain a 2x2, 3x3, or 4x4 grid of sensor tiles that are currently in alarm. If there are many concurrent feeds being monitored, the Penalty Box ensures that only feeds that need immediate attention are presented on the live multiviewer.
* **Sensor List:** To display a list of individually selected sensors. **Tip:** You can use the **Select Widget** search bar to filter the list of sensors.
4. Click **Save**.
#### Configure an Alarm Log Widget
After you add an Alarm Log widget to a multiviewer, configure its parameters:
1. On the widget, click the **Edit icon**, and then click **Configure**.
2. From the **Severity** list, select the severity level of alarms to display in the widget: **Select All**, **Critical**, **Major**, **Minor**, **Warning**, or **Info**.
3. From the **Status** list, select the alarm status type to display: **All**, **Active**, or **Resolved**.
4. From the **Limit** list, select the number of alarms to display in the widget.
5. From the **Refresh Interval** list, select how frequently the alarm data will be refreshed in the widget.
6. Click **Save**.
 #### Configure a Clock Widget
After you add a clock widget to a multiviewer, configure its parameters:
1. To select a time format, click **12 Hour** or **24 Hour**.
2. Select a time zone from the **Time Zone** list.
3. If you want to hide the widget’s title, click the **Edit icon** and click **Hide Title**.
#### Configure a Clock Widget
After you add a clock widget to a multiviewer, configure its parameters:
1. To select a time format, click **12 Hour** or **24 Hour**.
2. Select a time zone from the **Time Zone** list.
3. If you want to hide the widget’s title, click the **Edit icon** and click **Hide Title**.
 #### Configure a Dynamic Sensor List Widget
After you add a Dynamic Sensor List widget to a multiviewer, configure its parameters:
1. On the widget, click the **Edit icon**, and then click **Configure**.
2. You can filter the sensor list by typing a name query. For example, if you type **soccer**, only sensors that have the name "soccer" will be included in the widget view. In the **Sensor Name** box, type a name query to include only sensors that match the query..
3. You can filter the sensor list by alarm condition. From the **Status** list, select the status of sensors to display in the widget: **Select All**, **Critical**, **Major**, **Minor**, **Warning**, or **Info**.
4. From the **Limit** list, select the number of sensors to display in the widget.
5. Click **Save**.
#### Configure a Dynamic Sensor List Widget
After you add a Dynamic Sensor List widget to a multiviewer, configure its parameters:
1. On the widget, click the **Edit icon**, and then click **Configure**.
2. You can filter the sensor list by typing a name query. For example, if you type **soccer**, only sensors that have the name "soccer" will be included in the widget view. In the **Sensor Name** box, type a name query to include only sensors that match the query..
3. You can filter the sensor list by alarm condition. From the **Status** list, select the status of sensors to display in the widget: **Select All**, **Critical**, **Major**, **Minor**, **Warning**, or **Info**.
4. From the **Limit** list, select the number of sensors to display in the widget.
5. Click **Save**.
 #### Configure a Penalty Box Widget
After you add a Penalty Box widget to a multiviewer, configure its parameters:
1. On the widget, click the **Edit icon**, and then click **Configure**.
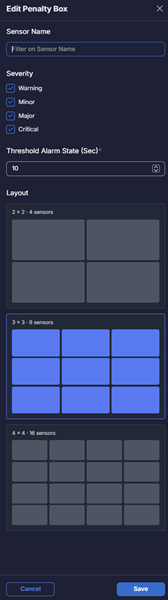
2. You can filter the sensor list by typing a name query. For example, if you type **football**, only sensors that have the name "football" will be included in the widget view. In the **Sensor Name** box, type a name query to include only sensors that match the query.
3. By default, the Penalty Box widget lists any alarms that sensors are actively reporting. To filter the list by severity, select the checkboxes for the levels to display: **Warning**, **Minor**, **Major**, or **Critical**.
4. In the **Threshold Alarm State (Sec)** box, select or type a value indicating the number of seconds the sensor will wait before reporting a sensor alarm in the widget.
5. The layout of the Penalty Box widget determines the maximum number of sensor tiles that will be displayed within the widget. In the **Layout** section, select a layout for the widget:
* **2 x 2 - 4 sensors**
* **3 x 3 - 9 sensors**
* **4 x 4 - 16 sensors**
#### Configure a Penalty Box Widget
After you add a Penalty Box widget to a multiviewer, configure its parameters:
1. On the widget, click the **Edit icon**, and then click **Configure**.
2. You can filter the sensor list by typing a name query. For example, if you type **football**, only sensors that have the name "football" will be included in the widget view. In the **Sensor Name** box, type a name query to include only sensors that match the query.
3. By default, the Penalty Box widget lists any alarms that sensors are actively reporting. To filter the list by severity, select the checkboxes for the levels to display: **Warning**, **Minor**, **Major**, or **Critical**.
4. In the **Threshold Alarm State (Sec)** box, select or type a value indicating the number of seconds the sensor will wait before reporting a sensor alarm in the widget.
5. The layout of the Penalty Box widget determines the maximum number of sensor tiles that will be displayed within the widget. In the **Layout** section, select a layout for the widget:
* **2 x 2 - 4 sensors**
* **3 x 3 - 9 sensors**
* **4 x 4 - 16 sensors**
 6. Click **Save**.
 #### Configure a Sensor List Widget
After you add a Sensor List widget to a multiviewer, configure its parameters:
1. On the widget, click the **Edit icon** and click **Select Sensors**.
2. From the sensor list that appears, select one or more sensors to display in the widget. Press **Shift** and click to select consecutive sensors, or press **Ctrl** and click to select non-consecutive sensors.
3. Click **Save**.
#### Configure a Sensor List Widget
After you add a Sensor List widget to a multiviewer, configure its parameters:
1. On the widget, click the **Edit icon** and click **Select Sensors**.
2. From the sensor list that appears, select one or more sensors to display in the widget. Press **Shift** and click to select consecutive sensors, or press **Ctrl** and click to select non-consecutive sensors.
3. Click **Save**.
 ### Remove a Tile or Widget
To remove a sensor tile or a widget from a multiviewer:
1. On the tile or widget, click the **Edit icon**.
2. Click **Remove**.
## Add a Sensor Overlay
If you add a sensor overlay to a sensor tile, critical technical data and stream vitals are displayed directly on top of a live video feed. Instead of just looking at a standard video window, you can use these preconfigured overlays to monitor the health of a signal without ever having to look away from the video.
Overlays typically display:
* Perceptual quality indicators such as Video MOS (Mean Opinion Score), which indicate whether the video visually looks correct to the end viewer.
* Audio levels and bitrates, putting live audio bars directly within or next to the video tile.
* Compliance metadata, which confirms that the stream meets specific broadcast requirements and standards.
You can configure which overlays are displayed on each sensor tile, or you can configure the overlay setting globally for all sensor tiles on the multiviewer dashboard. You can turn overlays on and off as needed.
To add a sensor overlay:
1. Click **More Options**, and then click **Sensor Overlay**.
2. Select the data to display in the overlay:
* Sensor Name
* Alarm Spotlight
* Error Timeline
* SCTE35 Markers
* MOS Score
* Closed Captions
* Audio Bars
## Modify a Multiviewer
In order to edit a multiviewer, you must make sure that the editing function is unlocked. If the multiviewer is locked for editing, click the **Unlock icon** on the top right.
### Remove a Tile or Widget
To remove a sensor tile or a widget from a multiviewer:
1. On the tile or widget, click the **Edit icon**.
2. Click **Remove**.
## Add a Sensor Overlay
If you add a sensor overlay to a sensor tile, critical technical data and stream vitals are displayed directly on top of a live video feed. Instead of just looking at a standard video window, you can use these preconfigured overlays to monitor the health of a signal without ever having to look away from the video.
Overlays typically display:
* Perceptual quality indicators such as Video MOS (Mean Opinion Score), which indicate whether the video visually looks correct to the end viewer.
* Audio levels and bitrates, putting live audio bars directly within or next to the video tile.
* Compliance metadata, which confirms that the stream meets specific broadcast requirements and standards.
You can configure which overlays are displayed on each sensor tile, or you can configure the overlay setting globally for all sensor tiles on the multiviewer dashboard. You can turn overlays on and off as needed.
To add a sensor overlay:
1. Click **More Options**, and then click **Sensor Overlay**.
2. Select the data to display in the overlay:
* Sensor Name
* Alarm Spotlight
* Error Timeline
* SCTE35 Markers
* MOS Score
* Closed Captions
* Audio Bars
## Modify a Multiviewer
In order to edit a multiviewer, you must make sure that the editing function is unlocked. If the multiviewer is locked for editing, click the **Unlock icon** on the top right.
 When editing is enabled, you can modify the multiviewer as needed by adding and removing tiles and widgets and changing their settings, for example.
## Copy a Multiviewer
You can copy an existing multiviewer and then modify the copy. To create a copy:
1. Click More Options, and then click **Save As New Multiviewer**.
2. In the **Multiviewer Name** box, type a name for the new multiviewer.
3. Click **Save**.
4. Click the Enable **Editing icon** on the top right and modify the new multiviewer as needed.
5. Click the **Save icon** to save your changes and disable editing.
## Set a Default Multiviewer
You can configure a multiviewer to be the default multiviewer that is displayed when you view the Multiviewer page.
To set a default multiviewer:
1. Click More Options, and then click **Manage Multiviewers**.
2. Click the **Edit icon** beside a multiviewer name, and then click **Set as Default**.
## Define Multiviewer Favorites
You can define multiviewer favorites to access them faster. Multiviewer favorites appear at the top of the Multiviewer list.
To set a multiviewer favorite:
1. Click **More Options**, and then click **Manage Multiviewers**.
2. Click the **Favorite icon** beside the multiviewer to set it as a favorite.
## Delete a Multiviewer
To delete a multiviewer:
1. Click **More Options**, and then click **Manage Multiviewers**.
2. Click the **Edit icon** beside a multiviewer name, and then click **Delete Multiviewer**.
3. Click **Delete** to confirm that you want to delete the multiviewer.
When editing is enabled, you can modify the multiviewer as needed by adding and removing tiles and widgets and changing their settings, for example.
## Copy a Multiviewer
You can copy an existing multiviewer and then modify the copy. To create a copy:
1. Click More Options, and then click **Save As New Multiviewer**.
2. In the **Multiviewer Name** box, type a name for the new multiviewer.
3. Click **Save**.
4. Click the Enable **Editing icon** on the top right and modify the new multiviewer as needed.
5. Click the **Save icon** to save your changes and disable editing.
## Set a Default Multiviewer
You can configure a multiviewer to be the default multiviewer that is displayed when you view the Multiviewer page.
To set a default multiviewer:
1. Click More Options, and then click **Manage Multiviewers**.
2. Click the **Edit icon** beside a multiviewer name, and then click **Set as Default**.
## Define Multiviewer Favorites
You can define multiviewer favorites to access them faster. Multiviewer favorites appear at the top of the Multiviewer list.
To set a multiviewer favorite:
1. Click **More Options**, and then click **Manage Multiviewers**.
2. Click the **Favorite icon** beside the multiviewer to set it as a favorite.
## Delete a Multiviewer
To delete a multiviewer:
1. Click **More Options**, and then click **Manage Multiviewers**.
2. Click the **Edit icon** beside a multiviewer name, and then click **Delete Multiviewer**.
3. Click **Delete** to confirm that you want to delete the multiviewer.