> ## Documentation Index
> Fetch the complete documentation index at: https://docs.up.telestream.com/llms.txt
> Use this file to discover all available pages before exploring further.
# Get Started with UP.Lens
Configuring UP.Lens consists of the following procedures:
1. Configure Live Sources if they have not been set up yet. See [Configure Live Sources](/platform/configure-live-sources).
2. Configure a monitoring template. In a monitoring template, you select the monitoring categories and the conditions to monitor. See [Monitoring Templates](#monitoring-templates).
3. Create and activate sensors, which are the fundamental monitoring components of UP.Lens. Sensors ingest live video feeds to provide real-time observability and stream analysis. See [Sensors](sensors).
4. (Optional) Add sensor tiles and widgets to a multiviewer dashboard. See [Manage Multiviewers](/lens/manage-multiviewers).
# Monitoring Templates
In a monitoring template, you define the categories that sensors will monitor, the alarm notifications that are enabled, and the parameters for generating those alarms.
## Create a New Template
When you create a new template, you can configure the categories that sensors will monitor. To create a transport template:
1. On the UP.Lens menu, click **Templates**. The Monitoring Templates page appears.
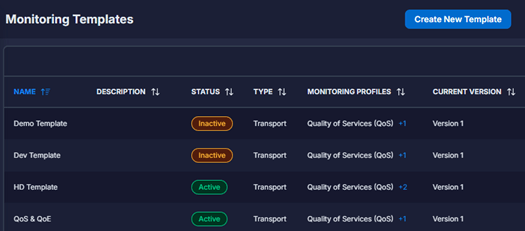 2. Click the arrows beside a column heading to sort the template list by that column. The heading of the sort column contains an arrow that indicates the sort order: up for ascending (0-9, A-Z) and down for descending (Z-A, 9-0).
3. Click **Create New Template**.
2. Click the arrows beside a column heading to sort the template list by that column. The heading of the sort column contains an arrow that indicates the sort order: up for ascending (0-9, A-Z) and down for descending (Z-A, 9-0).
3. Click **Create New Template**.
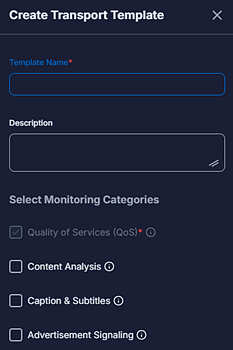 4. In the **Template Name** box, type a name for the template.
5. (Optional) In the **Description** box, type a description.
6. Select the monitoring categories to enable for the template. Quality of Service (QoS) is always enabled.
* **Content Analysis:** Select to get key content quality metrics, including Audio and Video MOS, to analyze the results from the transcoding process.
* **Caption & Subtitles:** Select to get information about the quality of the caption/subtitle experience.
* **Advertisement Signaling:** Select to get information about advertisement signaling, such as whether SCTE-35 messages are present in a stream and whether ad breaks are occurring at the correct intervals.
7. Click **Create**.
## Modify a Template
After you create a monitoring template, you can modify the template’s details, including the template name, description, categories monitored, and alarm settings.
If an active sensor is using a template, you can view the template’s details and configuration, but you cannot modify it. To modify the template, you must inactivate the sensor(s).
### Modify Template Details
To modify a template’s details:
1. Click the **Action icon** beside the template to modify.
2. Click **Edit Details**.
3. Modify the template as needed, and then click **Update**.
### Modify Alarm Settings
To modify a template’s alarm settings:
1. Click the **Action icon** beside the template to modify.
2. Click **Edit Configuration**.
4. In the **Template Name** box, type a name for the template.
5. (Optional) In the **Description** box, type a description.
6. Select the monitoring categories to enable for the template. Quality of Service (QoS) is always enabled.
* **Content Analysis:** Select to get key content quality metrics, including Audio and Video MOS, to analyze the results from the transcoding process.
* **Caption & Subtitles:** Select to get information about the quality of the caption/subtitle experience.
* **Advertisement Signaling:** Select to get information about advertisement signaling, such as whether SCTE-35 messages are present in a stream and whether ad breaks are occurring at the correct intervals.
7. Click **Create**.
## Modify a Template
After you create a monitoring template, you can modify the template’s details, including the template name, description, categories monitored, and alarm settings.
If an active sensor is using a template, you can view the template’s details and configuration, but you cannot modify it. To modify the template, you must inactivate the sensor(s).
### Modify Template Details
To modify a template’s details:
1. Click the **Action icon** beside the template to modify.
2. Click **Edit Details**.
3. Modify the template as needed, and then click **Update**.
### Modify Alarm Settings
To modify a template’s alarm settings:
1. Click the **Action icon** beside the template to modify.
2. Click **Edit Configuration**.
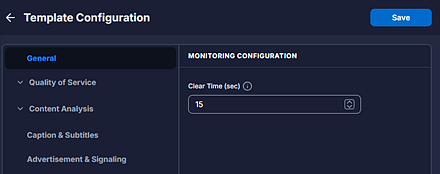 3. Configure the template as necessary and click **Save**.
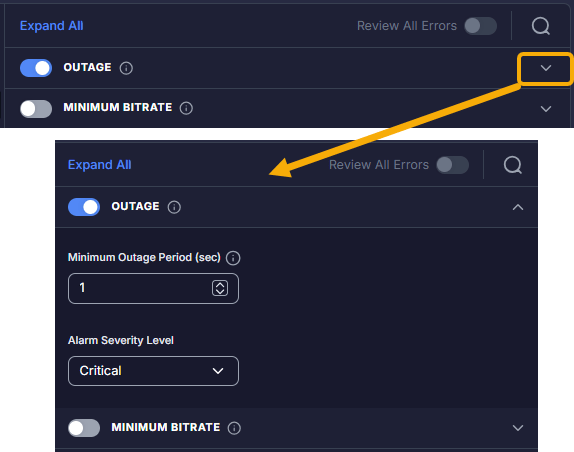
By default, the enable/disable toggle for each alarm is displayed. Click the alarm to expand the view and access the alarm's advanced settings, or click **Expand All** to view the advanced settings for all alarms.
3. Configure the template as necessary and click **Save**.
By default, the enable/disable toggle for each alarm is displayed. Click the alarm to expand the view and access the alarm's advanced settings, or click **Expand All** to view the advanced settings for all alarms.
 #### General Tab
To configure the general settings, click the **General** tab. Specify a value, in seconds, in the **Clear Time (sec)** box. Clear Time defines how long an underlying error condition must be resolved before the alarm clears. This prevents the system from flooding operators with notifications during periods of high-frequency errors. If the same alarm triggers multiple times within 15 minutes of the last alarm, the clear time increases exponentially. Once a 15-minute period passes without an alarm recurrence, the clear time resets to your configured minimum. The valid range is **15 to 900 seconds**.
#### Quality of Service / Transport Protocol Tab
Expand the **Quality of Service** section and click the **Transport Protocol** tab, where you can configure network-level alarms. For each alarm you enable, select an **Alarm Severity Level** (Info, Warning, Minor, Major, or Critical) and define the thresholds listed in the following table.
| **Alarm** | **Purpose** | **Thresholds and Valid Ranges** |
| ---------------- | ------------------------------------------------------------------------------------------------ | --------------------------------------------------------------------------------- |
| Outage | Detects when the stream is completely lost for a specified duration. | **Minimum Outage Period:** 0.1 to 60 seconds |
| Minimum Bitrate | Triggers when the stream's total bitrate falls below a sustained threshold. | **Minimum Bitrate:** 0.1 to 250 Mbit/s
#### General Tab
To configure the general settings, click the **General** tab. Specify a value, in seconds, in the **Clear Time (sec)** box. Clear Time defines how long an underlying error condition must be resolved before the alarm clears. This prevents the system from flooding operators with notifications during periods of high-frequency errors. If the same alarm triggers multiple times within 15 minutes of the last alarm, the clear time increases exponentially. Once a 15-minute period passes without an alarm recurrence, the clear time resets to your configured minimum. The valid range is **15 to 900 seconds**.
#### Quality of Service / Transport Protocol Tab
Expand the **Quality of Service** section and click the **Transport Protocol** tab, where you can configure network-level alarms. For each alarm you enable, select an **Alarm Severity Level** (Info, Warning, Minor, Major, or Critical) and define the thresholds listed in the following table.
| **Alarm** | **Purpose** | **Thresholds and Valid Ranges** |
| ---------------- | ------------------------------------------------------------------------------------------------ | --------------------------------------------------------------------------------- |
| Outage | Detects when the stream is completely lost for a specified duration. | **Minimum Outage Period:** 0.1 to 60 seconds |
| Minimum Bitrate | Triggers when the stream's total bitrate falls below a sustained threshold. | **Minimum Bitrate:** 0.1 to 250 Mbit/s
**Sustain Period:** 0 to 900 seconds |
| Maximum Bitrate | Triggers when the stream's total bitrate exceeds a sustained threshold. | **Maximum Bitrate:** 0.1 to 250 Mbit/s
**Sustain Period:** 0 to 900 seconds |
| Packet Loss Rate | Identifies network congestion, path instability, or insufficient SRT buffer sizing. | **Packet Loss/Second:** 1% to 100%
**Sustain Period:** 5 to 900 seconds |
| Latency | Flags consistently high Round Trip Time (RTT), indicating routing issues or excessive buffering. | **RTT:** 1 to 5000 milliseconds
**Sustain Period:** 5 to 900 seconds |
#### Quality of Service / Transport Stream Tab
In the **Quality of Service** section, click the **Transport Stream** tab, where you can configure alarms based on ETSI TR 101 290 guidelines for MPEG-TS transport integrity. For each priority level you enable, select an **Alarm Severity Level** (Info, Warning, Minor, Major, or Critical) and define the **Sustain Period** listed in the following table.
| **Alarm** | **Purpose** | **Sustain Period Valid Range** |
| --------------------- | ----------------------------------------------------------------------------------------------------------------------------------------------------- | ------------------------------ |
| TR 101 290 Priority 1 | Validates critical conditions (sync, PAT/PMT, continuity counters) required to successfully decode and demux the stream. | 1 to 60 seconds |
| TR 101 290 Priority 2 | Monitors timing and syntax health to detect early signs of degradation such as clock instability, timing drift, and CRC or PSI/SI consistency errors. | 10 to 120 seconds |
| TR 101 290 Priority 3 | Performs extended diagnostics on optional tables and buffer models that affect EPG data, conditional-access updates, or long-term decoder stability. | 30 to 600 seconds |
#### **Quality of Service** / **Video QoS** Tab
In the **Quality of Service** section, click the **Video QoS** tab, where you can configure alarms based on video stream health and bitrate parameters. For each alarm you enable, select an **Alarm Severity Level** (Info, Warning, Minor, Major, or Critical) and define the parameters listed in the following table.
| **Alarm** | **Purpose** | **Thresholds and Valid Ranges** |
| ------------------------ | ----------------------------------------------------------------------------------------------------------------------------------------------- | ----------------------------------------------------------------------------------------------------------------------------------- |
| Video PID Detect | Checks that a valid video PID is present and active in the transport stream. | **Sustain Period:** 1 to 900 seconds |
| Minimum Bitrate | Monitors the actual video PID bitrate to detect if it falls below the minimum limit (indicates underencoding, black frame, or encoder failure). | **Minimum Bitrate:** 0.1 to 250 Mbit/s
**Sustain Period:** 1 to 900 seconds |
| Maximum Bitrate | Monitors the actual video PID bitrate to detect if it exceeds the maximum limit (indicates rate-control fault or mux overallocation). | **Maximum Bitrate:** 0.1 to 250 Mbit/s
**Sustain Period:** 1 to 900 seconds |
| Video Media Loss Seconds | Monitors the continuity of the video stream by tracking transport-stream continuity count errors on the video PID. | **Continuity Count Error Rate:** 1% to 100%
**Measurement Window:** 1 to 10 seconds
**Sustain Period:** 1 to 60 seconds |
#### **Quality of Service** / **Audio QoS Tab**
In the **Quality of Service** section, click the **Audio QoS** tab, where you can configure alarms based on audio stream health and bitrate parameters. For each alarm you enable, select an **Alarm Severity Level** (Info, Warning, Minor, Major, or Critical) and define the parameters listed in the following table.
| **Alarm** | **Purpose** | **Thresholds and Valid Ranges** |
| -------------------------- | ----------------------------------------------------------------------------------------------------------------------------------------------- | -------------------------------------------------------------------------------------------------------------------------------------------------------------------------------------------------------------------------------------------------------------------------------------------------------------------------------------------------------------------------------------------------------------------------------------- |
| Audio PID Monitoring Rules | Configures how audio PIDs in the transport stream are analyzed to ensure required tracks are analyzed at the correct depth. | **Primary Audio PID:None** (exclude this PID from analysis), **QoS** (check transport integrity and bitrate), or **QoE + QoS** (include perceptual and impairment metrics such as MOS, clipping, and silence).
**Non-Primary Audio PID:None** (exclude this PID from analysis), **QoS** (check transport integrity and bitrate), or **QoE + QoS** (include perceptual and impairment metrics such as MOS, clipping, and silence). |
| Audio PID Detect | Checks that the correct audio PIDs are present and active. Detects missing PIDs or incorrect PID counts. | **Expected Number of Audio PIDs:** User-defined
**Sustain Period:** 1 to 60 seconds |
| Minimum Bitrate | Monitors the actual audio PID bitrate to detect if it falls below the minimum limit (indicates underencoding, black frame, or encoder failure). | **Minimum Bitrate:** 1 to 5000 kilobits per second
**Sustain Period:** 1 to 5000 seconds |
| Maximum Bitrate | Monitors the actual audio PID bitrate to detect if it exceeds the maximum limit (indicates rate-control fault or mux overallocation). | **Maximum Bitrate:** 0.1 to 250 megabits per second
**Sustain Period:** 1 to 5000 seconds |
| Audio Media Loss Seconds | Monitors the continuity of the audio stream by tracking transport-stream continuity count errors on the audio PID. | **Continuity Count Error Rate:** 1% to 100%
**Measurement Window:** 1 to 10 seconds
**Sustain Period:** 1 to 60 seconds |
#### **Quality of Service** / **Other QoS** Tab
In the **Quality of Service** section, click the **Other QoS** tab, where you can configure alarms based on the presence of captions, subtitles, and ad-insertion signaling. For each alarm you enable, select an **Alarm Severity Level** (Info, Warning, Minor, Major, or Critical) and define the parameters listed in the following table.
| **Alarm** | **Purpose** | **Thresholds and Valid Ranges** |
| ----------------------- | ---------------------------------------------------------------------------------------------------- | --------------------------------------------------------------------------------------------------------------------------------------------------------------------------------------------------------------------------------------------------------------------------------------------------------------- |
| Caption/Subtitle Detect | Checks for the presence of required caption and subtitle services (CEA-608, CEA-708, DVB, and TTML). | **Caption Detect 608:** Expected number of CEA-608 captions
**Caption Detect 708:** Expected number of CEA-708 captions
**Subtitle Detect DVB:** Expected number of DVB subtitling tracks
**Subtitle Detect TTML:** Expected number of TTML tracks
**Sustain Period:** 1 to 900 seconds |
| Ad Insertion PID | Checks for the presence of SCTE-35 PIDs that carry ad-insertion signaling messages. | **SCTE-35 PID Detect:** Expected number of SCTE-35 PIDs
**Sustain Period:** 1 to 900 seconds |
#### Content Analysis / **Video QoE** Tab
Expand the **Content Analysis** section and click the **Video QoE** tab, where you can configure alarms based on perceptual video quality and visible impairments. For each alarm you enable, select an **Alarm Severity Level** (Info, Warning, Minor, Major, or Critical) and define the parameters listed in the following table.
| **Alarm** | **Purpose** | **Thresholds and Valid Ranges** |
| ------------------------------ | ------------------------------------------------------------------------------------------------------------------------- | -------------------------------------------------------------------------------------------------------------------------------------------------------------------------------- |
| Video Perceptual Quality (MOS) | Monitors perceptual video quality and applies the Mean Opinion Score (MOS) index to report visible degradation. | **Absolute Quality**: 1 to 5
**Sustain Period**: 1 to 900 seconds |
| Still Frame | Detects visible video impairments caused by frozen video. | **Still Frame (%)**: 1% to 100%
**Sustain Period**: 1 to 900 seconds |
| Black Frame | Detects visible video impairments caused by black video. | **Black Screen (%)**: 1% to 100%
**Sustain Period**: 1 to 900 seconds |
| Pixelization | Detects visible blockiness artifacts caused by compression stress or packet loss. | **Pixelization Threshold (%)**: 1% to 100%
**Pixel Event**: 1 to 100 events
**Sustain Period**: 1 to 900 seconds |
| Frame Errors | Detects corrupted or partially decoded video frames, including slice faults and decode errors. | **Compression Threshold (%)**: User-defined
**Frame Errors Per Second**: User-defined
**Sustain Period**: 1 to 900 seconds |
| Spatial Compression Artifacts | Detects visible artifacts (blocking, ringing, banding, blur) often caused by encoder rate control issues. | **Artifacts Threshold (%)**: 1% to 100%
**Spatial Artifacts Events**: 1 to 50 events
**Measurement Window**: 1 to 60 seconds |
| Temporal Compression Artifacts | Detects visible artifacts (motion smear, ghosting, judder) often caused by encoder stress or predictive-frame corruption. | **Artifacts Threshold (%)**: 1% to 100%
**Temporal Artifacts Events in Window**: 1 to 50 events
**Measurement Window**: 1 to 60 seconds |
| SDR/HDR Metadata | Detects the presence and consistency of color space signaling (SDR vs. HDR). | **Alarm on Change**: Turn this toggle on if you want to be alarmed when the consistency of color space signaling changes unexpectedly.
**Sustain Period**: 1 to 900 seconds |
**Content Analysis** / **Audio QoE** Tab
In the **Content Analysis** section, click the **Audio QoE** tab, where you can configure alarms based on perceptual audio quality and audible impairments. For each alarm you enable, select an **Alarm Severity Level** (Info, Warning, Minor, Major, or Critical) and define the parameters listed in the following table.
| **Alarm** | **Purpose** | **Thresholds and Valid Ranges** |
| ------------------------------ | -------------------------------------------------------------------------------------------------------------------------------------------------------------------- | --------------------------------------------------------------------------------------------------------------------------------------------------------------------------------------------------------------- |
| Audio Perceptual Quality (MOS) | Monitors perceptual audio quality (MOS) to detect sustained degradation. | **Absolute Quality**: 1 to 5
**Sustain Period**: 1 to 900 seconds |
| Audio Silence | Detects sustained periods of audio silence on one or more channels. | **Loudness Threshold (dBFS)**: -90 to -20 dBFS
**Channels**: Select the audio channels for alarm generation.
**Detection Mode**: All Silent or Any Silent
**Sustain Period**: 1 to 120 seconds |
| Dialnorm Deviation | Ensures compliance with loudness standards by detecting when the difference between program loudness (LKFS) and the declared dialnorm exceeds the defined threshold. | **Deviation (LKFS)**: 0.1 to 10 LKFS
**Sustain Period**: 1 to 300 seconds |
| Audio Clipping | Monitors true peak audio levels to detect clipping or inter-sample distortion. | **True Peak Level (dBTP)**: -6 to 0 dBTP
**Sustain Period**: 1 to 300 seconds |
#### **Captions & Subtitles**
Click the **Captions & Subtitles** tab, where you can configure the Caption Decode Errors alarm to check for errors when decoding caption data from the transport stream. Select an **Alarm Severity Level** (Info, Warning, Minor, Major, or Critical) and define the parameters listed in the following table.
| **Alarm** | **Purpose** | **Thresholds and Valid Ranges** |
| :-------------------- | :----------------------------------------------------------------------------------------------------------------------------------------------------------------------------- | :--------------------------------------------------------------------------------------------------------------------------------------------------------------------------------------------------------------------------------------------------------------------------------------------------- |
| Caption Decode Errors | Checks for errors when decoding caption data from the transport stream. An alarm is generated when the number of parsing or rendering errors exceeds the configured threshold. | **Decode Error Rate**: 0 to 100
**Sustain Period (sec)**: 1 to 900 seconds
**Caption Type**: Select **Auto**, **608**, **708**, **DVB**, or **TTML**.
**Caption Extraction**: Turn on the toggle to extract and store analyzed captions for review in the Visual Trending timeline. |
#### **Advertisement & Signaling** Tab
Click the **Advertisement & Signaling** tab, where you can configure alarms based on SCTE-35 ad-insertion signaling and alignment. For each alarm you enable, select an **Alarm Severity Level** (Info, Warning, Minor, Major, or Critical) and define the parameters listed in the following table.
| **Alarm** | **Purpose** | **Thresholds and Valid Ranges** |
| ----------------------- | ------------------------------------------------------------------------------------------------------------------------------------------------------------------------------------------------------------------------------------ | ------------------------------------------------------------------------------------------------------------------------------------------------------------------------------------------------------------------------------------------------------------------------------------------------------------------------------------------------------------------------------------------------------------------------------------------------------------------------------------ |
| Ad Insertion Frequency | Monitors the cadence and baseline frequency of SCTE-35 ad markers within a live transport stream. An alarm is generated when expected signaling markers are missing or drop below configured expectations over a measurement window. | **Splice Command**: Select **Splice Insert**, **Time Signal**, or **Any**.
**Segment Type**: Select **All**, **0x30 Provider Ad Start, 0x31 Provider Ad End**, **0x32 Distributor Ad Start**, **0x33 Distributor Ad End**, or **0x34 Provider Placement Opportunity Start**.
**Ad Schedule**: Click **+ Add Ad Schedule** and configure the **Start Time**, **End Time**, and **Ad Interval** (in minutes). |
| SCTE-35 / IDR Alignment | Verifies that SCTE-35 splice commands align precisely with video keyframes (IDR frames) to prevent downstream digital ad insertion (DAI) playback issues. | **Offset Tolerance (ms)**: 1 to 900 ms
**Max Misaligned Splice Events in Window**: 1 to 900
**Sustain Period (sec)**: 1 to 300 seconds |
| SCTE Event Out of Order | Performs stateful pairing checks on incoming SCTE-35 cue messages to flag out-of-order timestamps, duplicate START cues, unclosed ad breaks, or unexpected return-to-network END commands. | **Message Type**: Select **Auto**, **Splice Insert**, or **Time Signal**
**Closure Window (min)**: 1 to 30 minutes
**Strict Pairing**: Turn this toggle on to rigidly enforce start/end matching based on unique event IDs.
/**Time Signal PTS Cadence**: Turn this toggle on to validate timestamp uniformity across repetitive upstream time\_signal heartbeat messages.
**Violation Threshold**: 1 to 100
**Violation Window (min)**: 1 to 120 minutes |
## Filter the Template List
To filter the template list by name, click the **Search icon** and type some or all of a template name.
## View Template Details
To view a monitoring template’s details, click the **Action icon** beside the template and select View **Details**.
To view a template’s alarm settings, click the **Action icon** beside the template and select **View Configuration**.
## Copy a Template
To copy a monitoring template:
1. Click the **Action icon** beside the template to copy.
2. Click **Duplicate**.
3. In the **Template Name** box, type a name for the template.
4. Click **Save**.
## Delete a Template
If you don’t want to reuse a monitoring template, you can delete it after deleting the sensor.
To delete a monitoring template:
1. Click the **Action icon** beside the template to delete.
2. Click **Delete**.
3. Click **Delete** to confirm that you want to delete the template.
# Sensors
Sensors are cloud-native workers deployed within a region (either in Telestream's infrastructure or a customer's virtual private cloud) to monitor live streams. In UP.Lens, sensors are hooked to Secure Reliable Transport (SRT) feeds to analyze signals without disrupting the workflow.
Sensors have two levels of monitoring capabilities:
* Basic Sensor: Focuses on Quality of Service (QoS). It monitors network-level performance, including latency, bandwidth, link speed, and jitter.
* Premium Sensor: Focuses on Quality of Experience (QoE) and compliance. In addition to QoS, a premium sensor performs deep video and audio analysis (such as detecting frozen frames or silent audio) and monitors SCTE-35 ad-trigger markers.
Sensors enable you to do the following:
* Sensors feed into a multiviewer dashboard. This allows you to see live video and audio bars in a grid format. You can identify if a camera feed fails, for example, and you can automatically move the worst-performing feeds to the top of the screen so you can focus on errors.
* While the multiviewer is for real-time observation, the sensors constantly record metadata and thumbnails to allow for retrospective analysis. If a stream fails, you can rewind to see exactly when key performance indicators, such as bitrate, began to drift.
* Sensors help correlate issues across different points, such as identifying whether a problem in a distribution feed originated at the source camera.
* Sensors are designed to be predictive. By monitoring trends (such as latency drifting in the wrong direction), sensors can alert you before a signal degrades significantly, providing actionable alerts.
* Sensors help you ensure that a broadcast is meeting its legal and financial requirements. Sensors confirm that SCTE-35 markers are present so that ads can be inserted and the feed can be monetized. Sensors validate that the correct language tracks, captions, and subtitles are present and legible.
While multiviewers provide a visual look at video, sensor metadata provides the underlying data that describes the stream's health and configuration:
* Technical vitals: Real-time metrics such as bitrate, bandwidth, latency, jitter, and link speed.
* Stream attributes: Details such as resolution (for example, UHD vs. HD), frame rate, and codec information (for example, AVC vs. HEVC)
* Audio/video track info: Metadata identifying the number of audio tracks, the language of those tracks, and the presence of captions or subtitles.
* Compliance markers: Critical signaling data such as SCTE-35 ad markers, which indicate when an advertisement can be inserted into a stream.
## View Sensors
To view the existing sensors, click Sensors on the UP.Lens menu. At the top of the Sensors page that appears, you can view the total number of sensors and how many sensors are in the following alarm states:
* Gray: Inactive
* Red: Critical alarm
* Dark orange: Major alarm
* Yellow: Minor alarm
* Light orange: Warning alarm
* Green: Good/no alarms
You can click on a sensor status to view only sensors that have that status.
 ## Create a Sensor
To create a sensor:
1. On the UP.Lens menu, click **Sensors**.
2. Click **Create New Sensor**.
## Create a Sensor
To create a sensor:
1. On the UP.Lens menu, click **Sensors**.
2. Click **Create New Sensor**.
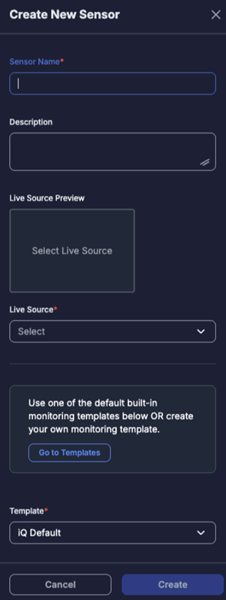 3. In the **Sensor Name** box, type a name for the sensor.
4. (Optional) In the **Description** box, type a description.
5. A preview of the source appears in the Live Source Preview box.
6. From the **Live Source** list, select a live source. **Note:** Multiple sensors can monitor one source, but sensors and Live Sources typically have a 1:1 relationship.
7. Select a template from the **Template** list. You can use one of the built in monitoring templates or create your own monitoring template. To create a monitoring template, click **Go to Templates** and create a template. See [Create a New Template](#CreateANewTemplate).
8. Click **Create**. The sensor has been created, but it is not active yet. See [Activate a Sensor](#activate-a-sensor).
## Filter the Sensor List
By default, the sensor list displays all active and inactive sensors. The colored status indicators at the top of the page indicate how many sensors are inactive and how many are in the various alarm severity states: Critical, Major, Minor, Warning, and Good. Click any of those colored status indicators to filter the sensor list by that indicator.
3. In the **Sensor Name** box, type a name for the sensor.
4. (Optional) In the **Description** box, type a description.
5. A preview of the source appears in the Live Source Preview box.
6. From the **Live Source** list, select a live source. **Note:** Multiple sensors can monitor one source, but sensors and Live Sources typically have a 1:1 relationship.
7. Select a template from the **Template** list. You can use one of the built in monitoring templates or create your own monitoring template. To create a monitoring template, click **Go to Templates** and create a template. See [Create a New Template](#CreateANewTemplate).
8. Click **Create**. The sensor has been created, but it is not active yet. See [Activate a Sensor](#activate-a-sensor).
## Filter the Sensor List
By default, the sensor list displays all active and inactive sensors. The colored status indicators at the top of the page indicate how many sensors are inactive and how many are in the various alarm severity states: Critical, Major, Minor, Warning, and Good. Click any of those colored status indicators to filter the sensor list by that indicator.
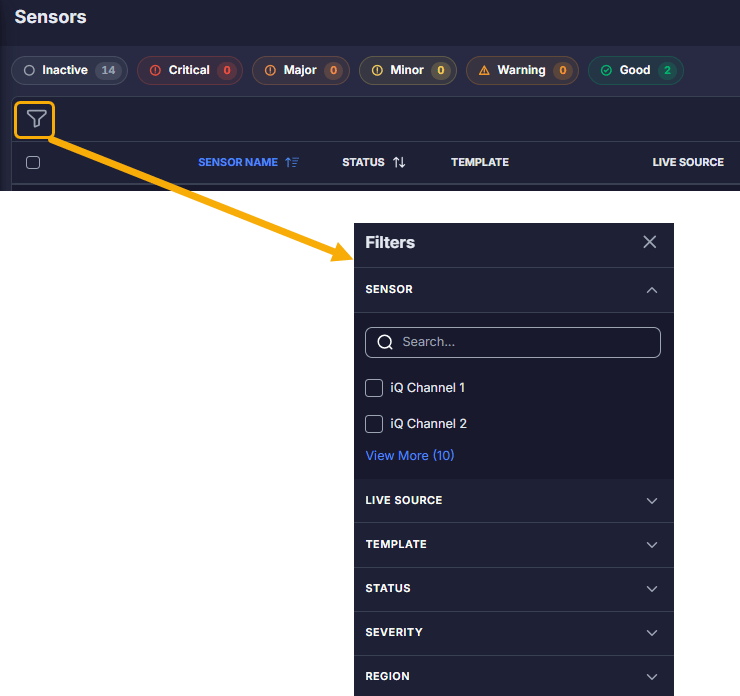
 You can also filter the sensors by sensor name, live source, template, status, alarm severity, and/or region.
1. Click the **Filter icon** and select the desired filter parameters:
* **Filter by sensor name:** Expand the **Sensor** section and select the sensors to display.
* **Filter by live source:** Expand the **Live Source** section and select the live sources to display.
* **Filter by template:** Expand the **Template** section and select the templates to display.
* **By status:** Expand the **Status** section and select **Active** and/or **Inactive**.
* **Filter by alarm severity:** Expand the **Severity** section and select the alarm severities to display: **Critical**, **Major**, **Minor**, and/or **Warning**.
* **Filter by region:** Expand the **Region** section and select the regions to display.
2. Click **Apply**.
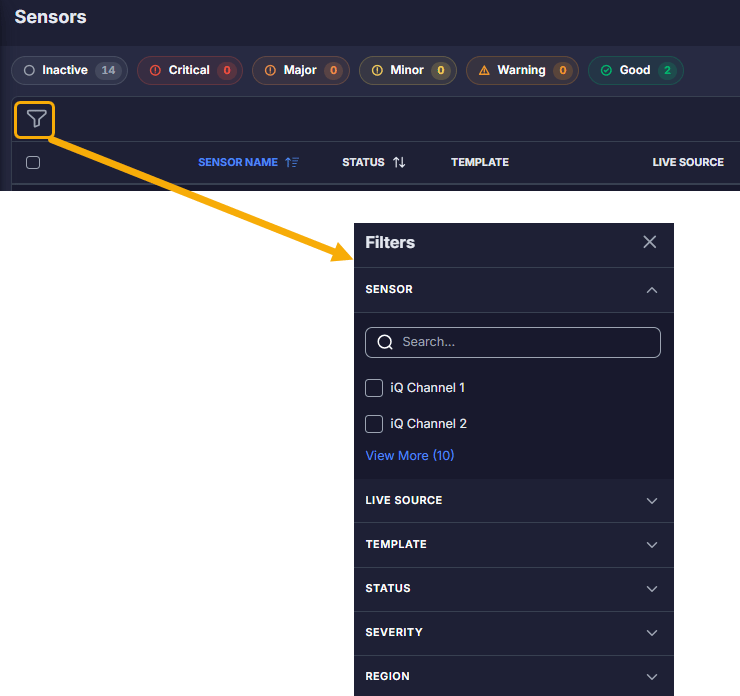
You can also filter the sensors by sensor name, live source, template, status, alarm severity, and/or region.
1. Click the **Filter icon** and select the desired filter parameters:
* **Filter by sensor name:** Expand the **Sensor** section and select the sensors to display.
* **Filter by live source:** Expand the **Live Source** section and select the live sources to display.
* **Filter by template:** Expand the **Template** section and select the templates to display.
* **By status:** Expand the **Status** section and select **Active** and/or **Inactive**.
* **Filter by alarm severity:** Expand the **Severity** section and select the alarm severities to display: **Critical**, **Major**, **Minor**, and/or **Warning**.
* **Filter by region:** Expand the **Region** section and select the regions to display.
2. Click **Apply**.
 ## Sort the Sensor List
You can sort the sensor list by the info in any of the following columns: Sensor Name, Status, Up Time, Sensor Mon Time, or Updated Date. Click a column heading to sort the list. An up arrow indicates ascending order (0-9, A-Z); a down arrow indicates descending order (Z-A, 9-0).
## Sort the Sensor List
You can sort the sensor list by the info in any of the following columns: Sensor Name, Status, Up Time, Sensor Mon Time, or Updated Date. Click a column heading to sort the list. An up arrow indicates ascending order (0-9, A-Z); a down arrow indicates descending order (Z-A, 9-0).

 ## Modify a Sensor
To modify a sensor:
1. Click the **Action icon** beside the Created Date for the sensor.
2. Click **Edit**.
3. Modify the sensor as needed, and then click **Update**.
## Delete a Sensor
You can delete individual sensors or all sensors. When you delete a sensor, it is removed from any multiviewers that refer to it. See [Manage Multiviewers](/lens/manage-multiviewers).
To delete individual sensors:
1. Select the checkbox for the sensor(s), and then click **Delete**.
2. Click **Delete** to confirm that you want to delete the sensor(s).
To delete all sensors:
1. Select the **Select All** checkbox, and then click **Delete**.
2. Click **Delete** to confirm that you want to delete this sensor.
## Preview a Sensor
Sensor previews provide a focused, high-fidelity view of a stream’s output. A sensor preview provides:
* **Live video and audio:** A full-motion, subsecond latency view of the signal as it exists in the cloud.
* **Deep metadata:** A real-time readout of vitals such as bitrate, resolution, audio track mapping, and SCTE-35 ad markers.
* **Direct control:** You can toggle between live monitoring and historical troubleshooting.
When you view a sensor preview, you can do the following:
* Ensure that the video content is correct, framed properly, and free of artifacts (such as macroblocking or ghosting).
* Verify that the stream matches its intended specifications. For example, you can confirm that a feed is UHD and has audio tracks in a particular language.
* Triage alarm conditions. When an alarm fires in the multiviewer, you can use a sensor preview to spot-check the error before escalating the issue.
* Look back at historical trending data.
To preview a sensor:
1. Click the **Action icon** beside the Created Date for the sensor.
2. Click **Preview**.
## Modify a Sensor
To modify a sensor:
1. Click the **Action icon** beside the Created Date for the sensor.
2. Click **Edit**.
3. Modify the sensor as needed, and then click **Update**.
## Delete a Sensor
You can delete individual sensors or all sensors. When you delete a sensor, it is removed from any multiviewers that refer to it. See [Manage Multiviewers](/lens/manage-multiviewers).
To delete individual sensors:
1. Select the checkbox for the sensor(s), and then click **Delete**.
2. Click **Delete** to confirm that you want to delete the sensor(s).
To delete all sensors:
1. Select the **Select All** checkbox, and then click **Delete**.
2. Click **Delete** to confirm that you want to delete this sensor.
## Preview a Sensor
Sensor previews provide a focused, high-fidelity view of a stream’s output. A sensor preview provides:
* **Live video and audio:** A full-motion, subsecond latency view of the signal as it exists in the cloud.
* **Deep metadata:** A real-time readout of vitals such as bitrate, resolution, audio track mapping, and SCTE-35 ad markers.
* **Direct control:** You can toggle between live monitoring and historical troubleshooting.
When you view a sensor preview, you can do the following:
* Ensure that the video content is correct, framed properly, and free of artifacts (such as macroblocking or ghosting).
* Verify that the stream matches its intended specifications. For example, you can confirm that a feed is UHD and has audio tracks in a particular language.
* Triage alarm conditions. When an alarm fires in the multiviewer, you can use a sensor preview to spot-check the error before escalating the issue.
* Look back at historical trending data.
To preview a sensor:
1. Click the **Action icon** beside the Created Date for the sensor.
2. Click **Preview**.
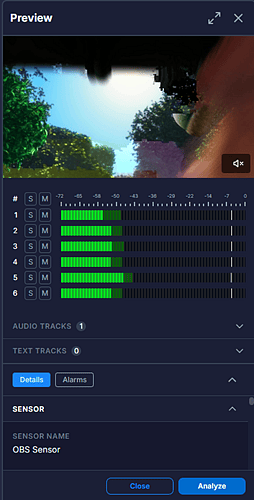 The following information about the stream is displayed when available:
* **Live video preview:**
* Click the **Speaker icon** to mute or unmute the audio.
* Click the **Full Screen icon** to view a full-screen preview.
* **Audio tracks:** Displays the audio bars for the audio channels. Click **S** beside a channel to listen to the audio for just that channel, or click **M** to mute the channel.
* **Text tracks:** A list of any available text tracks.
* **Sensor name:** The name of the sensor.
* **Region:** The region that the stream is in.
* **SRT mode:** The SRT mode (Caller or Listener).
* **Connection:** The live source that provides the connection to the sensor.
* **Monitoring template:** The monitoring template associated with the sensor.
* **Video PID:** The stream’s video PID.
* **Codec:** The stream’s codec.
* **Resolution @ FPS:** The stream’s resolution in frames per second.
* **Profile @ level:** Profile is the standard sets of video codec capabilities. Level is the specified set of constraints that indicate a degree of required decoder performance for a video profile.
* **Chroma format:** The streams chroma format.
* **Bitrate:** The stream’s bitrate.
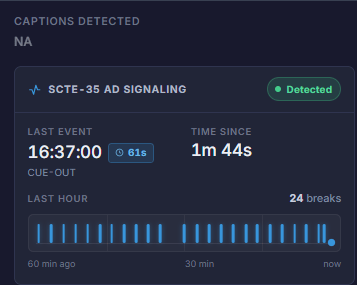
* **Captions detected:** Indicates whether captions have been detected.
* **Ad signaling detected:** Indicates whether ad signaling has been detected and provides a timeline of ad signaling activity for the last 60 minutes.
The following information about the stream is displayed when available:
* **Live video preview:**
* Click the **Speaker icon** to mute or unmute the audio.
* Click the **Full Screen icon** to view a full-screen preview.
* **Audio tracks:** Displays the audio bars for the audio channels. Click **S** beside a channel to listen to the audio for just that channel, or click **M** to mute the channel.
* **Text tracks:** A list of any available text tracks.
* **Sensor name:** The name of the sensor.
* **Region:** The region that the stream is in.
* **SRT mode:** The SRT mode (Caller or Listener).
* **Connection:** The live source that provides the connection to the sensor.
* **Monitoring template:** The monitoring template associated with the sensor.
* **Video PID:** The stream’s video PID.
* **Codec:** The stream’s codec.
* **Resolution @ FPS:** The stream’s resolution in frames per second.
* **Profile @ level:** Profile is the standard sets of video codec capabilities. Level is the specified set of constraints that indicate a degree of required decoder performance for a video profile.
* **Chroma format:** The streams chroma format.
* **Bitrate:** The stream’s bitrate.
* **Captions detected:** Indicates whether captions have been detected.
* **Ad signaling detected:** Indicates whether ad signaling has been detected and provides a timeline of ad signaling activity for the last 60 minutes.
 3. To view alarms for the stream, click **Alarms**. To view inactive alarms, turn off the **Active Only** toggle.
4. To view the Visual Trending data, click **Analyze**. See [Visual Trending](/lens/analyze-diagnostics#visual-trending).
## View Visual Trending Data
The Visual Trending view provides a graphical representation of stream performance metrics over time.
To view Visual Trending data:
1. Click the **Action icon** beside the Created Date for the sensor.
2. Click **View Visual Trending**. See [Visual Trending](/lens/analyze-diagnostics#visual-trending).
## Activate a Sensor
When you activate a sensor, UP.Lens provisions a compute resource in the cloud (Telestream's or yours), deploys the sensor, and starts monitoring the billing clock. Billing for activated sensors is per minute. You can activate individual sensors or all sensors.
To activate individual sensors:
1. Select the checkbox for the sensor(s), and then click **Activate**.
3. To view alarms for the stream, click **Alarms**. To view inactive alarms, turn off the **Active Only** toggle.
4. To view the Visual Trending data, click **Analyze**. See [Visual Trending](/lens/analyze-diagnostics#visual-trending).
## View Visual Trending Data
The Visual Trending view provides a graphical representation of stream performance metrics over time.
To view Visual Trending data:
1. Click the **Action icon** beside the Created Date for the sensor.
2. Click **View Visual Trending**. See [Visual Trending](/lens/analyze-diagnostics#visual-trending).
## Activate a Sensor
When you activate a sensor, UP.Lens provisions a compute resource in the cloud (Telestream's or yours), deploys the sensor, and starts monitoring the billing clock. Billing for activated sensors is per minute. You can activate individual sensors or all sensors.
To activate individual sensors:
1. Select the checkbox for the sensor(s), and then click **Activate**.
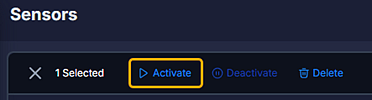 2. Click **Activate** to confirm that you want to activate the sensor(s).
To activate all sensors:
1. Select the Select All checkbox, and then click **Activate**.
2. Click **Activate** to confirm that you want to activate this sensor.
If the activation attempt fails, Lens displays an error message and adds a colored icon to the Status column.
## Deactivate a Sensor
When you deactivate a sensor, per-minute billing of the sensor stops. Deactivate sensors when they are not in use to avoid unnecessary infrastructure costs.
You can deactivate individual sensors or all sensors.
To deactivate individual sensors:
1. Select the checkbox for the sensor(s), and then click **Deactivate**.
2. Click **Deactivate** to confirm that you want to deactivate the sensor(s). The sensor status changes from Active (green) to Inactive (gray).
To deactivate all sensors:
1. Select the Select All checkbox, and then click **Deactivate**.
2. Click **Deactivate** to confirm that you want to deactivate these sensors. The sensor status changes from Active (green) to Inactive (gray).
When live monitoring is stopped, the Troubleshooting Time Machine retains the historical trending data and thumbnails for a set period (usually 24 hours), depending on your organization's data retention policy.
2. Click **Activate** to confirm that you want to activate the sensor(s).
To activate all sensors:
1. Select the Select All checkbox, and then click **Activate**.
2. Click **Activate** to confirm that you want to activate this sensor.
If the activation attempt fails, Lens displays an error message and adds a colored icon to the Status column.
## Deactivate a Sensor
When you deactivate a sensor, per-minute billing of the sensor stops. Deactivate sensors when they are not in use to avoid unnecessary infrastructure costs.
You can deactivate individual sensors or all sensors.
To deactivate individual sensors:
1. Select the checkbox for the sensor(s), and then click **Deactivate**.
2. Click **Deactivate** to confirm that you want to deactivate the sensor(s). The sensor status changes from Active (green) to Inactive (gray).
To deactivate all sensors:
1. Select the Select All checkbox, and then click **Deactivate**.
2. Click **Deactivate** to confirm that you want to deactivate these sensors. The sensor status changes from Active (green) to Inactive (gray).
When live monitoring is stopped, the Troubleshooting Time Machine retains the historical trending data and thumbnails for a set period (usually 24 hours), depending on your organization's data retention policy.